As a brand or business, building credibility with your online audience should be part of your overall marketing strategy. Besides building our a thorough content strategy, how can you prove that you are who you say you are? That’s where Facebook verification enters the picture, with a blue checkmark giving a clear distinction between an authentic Page and a Page created by fans or imposters.
Getting verified on Facebook is a must for Pages and profiles that are well-known and highly searched that may also be highly susceptible to being replicated or parodied. This includes public figures, brands and companies to name a few.
In this post, you’ll discover some essential steps on how to get verified on Facebook as well as a few additional details to give you a thorough understanding of how Facebook verification works. Let’s get started.
What does being verified mean?
Before we get into the process of Facebook verification, you’ll want to know what it means to get verified on Facebook in the first place and why it is so important.
As we briefly touched on earlier, businesses and public figures may often see people creating Pages and profiles similar to theirs – whether it’s to imitate them or to build a fan community. Even if there’s no malicious intent behind those Pages and profiles, there’s still a huge risk of other Facebook users mistaking them for the real thing.
A Facebook verification checkmark provides credibility to official pages and puts a clear distinction between the real Pages and the Pages run by fans or imposters.
In addition, Facebook prioritizes verified profiles and Pages in its search results. So Facebook verification ensures that your Page prominently shows up at the top of relevant searches, which could further improve your reach. See how the official verified Page for Workday gets top priority when you search for the company name on Facebook.

Blue vs. gray checkmarks: What’s the difference?
While we’re familiar with the blue Facebook verification mark, you might have noticed some gray checkmarks as well. What do these mean and what’s the difference between the two? Let’s take a look:
Blue checkmark
The blue checkmark or verification badge on Facebook is for people or Pages that are of public interest. Think large companies, popular brands and celebrities.

Gray checkmark
The gray checkmark or verification badge on Facebook is for Pages that are still authentic but don’t meet the public interest qualification. For example, a local outlet of a nationwide retail chain could have a gray checkmark. This is ideal for small and local businesses and organizations as well as businesses with multiple outlets in different cities.
But Facebook made an update that removed the gray verification badge in October 2019. This meant that small and local business owners would need to go through extra steps to have their Pages verified on Facebook.
Who can get verified on Facebook?
Although in theory, anyone can get verified on Facebook, they have to meet strict verification criteria in order to get approved. Besides following the company’s terms of service, your account should be:
- Authentic – It should represent a real person, entity or business.
- Complete – It should be active and have all the necessary details such as an “About” section and a profile photo. In addition, it should have at least one post.
- Notable – The person, entity or business it represents should be well-known and get plenty of searches. Facebook is more likely to approve your application if multiple news sources and publications feature the account.
- Unique – It should be the unique presence of the person, entity or business it represents. Facebook only verifies one account per business or person, with the exception of language-specific accounts. And note that it doesn’t verify accounts for general interests. For example, it won’t verify a Page dedicated to healthy food but it will verify a page representing a registered publication that’s dedicated to healthy food.
The above requirements are only the bare minimum and don’t necessarily guarantee that you’ll get verified. To improve your chances of getting verified, make sure that your account looks highly credible. This means regularly publishing highly informative and engaging posts instead of sticking to the minimum requirement of one post, for instance.
Note that in addition to the above, Facebook may also have other requirements to verify Pages and profiles belonging to law enforcement agencies, politicians, elected officials and city governments. Be sure to be logged into your Facebook account to see all of Facebook’s verification criteria for these types of Pages as well as the contact.
How to get verified on Facebook
After ensuring that you meet the Facebook verification criteria, you can start the application process. Let’s find out the step-by-step process of how to get verified on Facebook:
Step 1: Open the contact form
Open the contact form to submit a verification request.
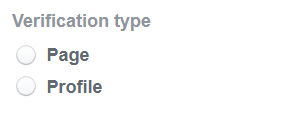
Step 2: Choose your verification type
Choose the verification type – whether you want to get a Page or profile verified. Note that although you can get your profile verified on Facebook, the approval criteria may be a little more complex. For example, you’ll need a significant amount of followers to prove that you’re worthy of the coveted blue verification badge.

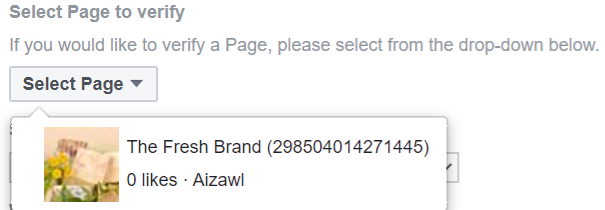
Step 3: Select which Page or profile to verify
Then select the Page you want to verify if you need Facebook page verification. In case of profile verification, you’ll need to provide your profile URL instead. For this example, we’ll choose to verify a Page.

Step 4: Select the category for the Page or profile
Select the relevant category for your Page or profile. Note that Facebook only provides a few category options. If none of the given options are relevant to your Page, then select “Other.”

Step 5: Add your country
Select the country from which the company, entity or individual originates.
Step 6: Attach appropriate personal or business identification information
This is where the process differs if you are applying for verification for a person or a business.
If the account you want to verify represents a person, Facebook requires a valid photo ID showing the name and date of birth of the individual. You can provide a photo of your driver’s license, passport or national identification card.
For accounts representing businesses, organizations and other entities, you’ll need to provide one of the following documents bearing an official seal or watermark:
- Phone or utility bill of the organization
- Certificate of formation
- Articles of incorporation
- Tax/tax exemption documents of the organization

Step 7: Explain why you want verification
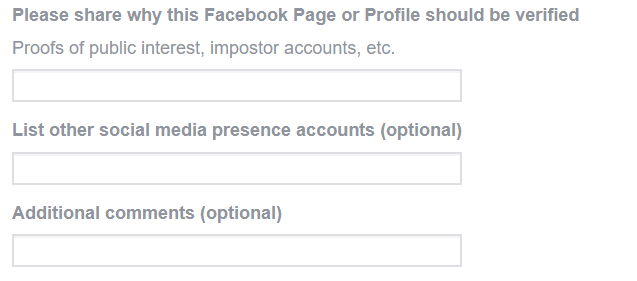
After that, Facebook will ask you to provide a reason why your Page or profile should get verified. For this section, try to provide some information about why you need a verification badge to make your account stand out.
Perhaps it’s of public interest, so you’ll want to share links that can prove your account’s notability. For instance, you could link to features or mentions on reputable news publications.
Or perhaps you want to get verified on Facebook because your account is at risk of losing credibility due to imposters. If you’ve already seen imposter accounts popping up, you could include links to prove your claim.

You could also include links to your other accounts to show your massive social media presence or add more comments if you wish.
Step 8: Submit the form
After filling out all the details in the contact form, click on the “Send” button at the bottom of the page. This completes the application process.
How long does it take to get verified?
The time taken to get verified on Facebook differs from account to account. Although Facebook doesn’t specify the typical timeframe, you could get a response as soon as 48 hours or wait up to 45 days. It may take longer to verify accounts representing businesses as the Facebook team will have to manually review your documents to confirm their authenticity.
What happens if Facebook rejects my application?
Keep in mind that meeting the basic verification criteria doesn’t guarantee that you’ll get verified. Facebook might still reject your application without specifying a reason. When this happens, you’ll have the option to reapply for verification after 30 days. But make sure you put in additional effort to improve your chances of getting verified this time round.
Here are the possible next steps in case Facebook rejects your application:
- Reach out to Facebook support and try to get more information about why your application was rejected. In case you can get this info, you’ll know exactly what you need to do to get verified the next time you apply.
- Create more high-quality content and maintain a regular posting schedule while ramping up your Facebook marketing efforts.
- If you have brand accounts on other social networks, make sure you boost your presence there as well. This will also help you improve your chances of getting verified on those platforms.
Improve your credibility with Facebook verification
Considering all the steps involved in getting verified on Facebook, you might wonder whether it’s worth all the effort. But keep in mind that a blue verification badge could make all the difference for your Page or profile credibility. It could even improve your visibility in relevant Facebook searches.
So make the most of the tips given above to get verified on Facebook. And if you want to see more success on the platform, don’t forget to brush up your skills on how to use the Facebook Business Manager.
This post Everything you need to know about how to get verified on Facebook originally appeared on Sprout Social.
from Sprout Social https://ift.tt/3fvDhqJ
Do You Know You Can Buy Instagram Followers from SocialKingMaker.com?
No comments:
Post a Comment